Creating correlations
After importing wells into your depth page, you draw correlations either using your mouse, the Create Well Correlations dialog box, or the Correlation Wizard. Correlations are used to establish the boundaries of zones, and zones encapsulate velocity fields. For details about zones, see Related Topics below.
Draw correlations that span the entire cross section and that replicate horizons, or draw correlations to replicate geological anomalies such as inter-well channels.
The border of the depth page canvas is one large correlation and the outside border of each well another. Crossing these objects with a correlation line automatically latches the correlation line to the canvas or the well border. Crossing an existing correlation line while drawing a new correlation line latches the new correlation line to the existing one and ends the current correlation.
GeoSyn can't generate a time model without at least one correlation that horizontally spans the entire depth page canvas creating an upper zone and a lower zone.
Before creating correlations, from the Edit
menu, select Display Parameters
( ) and ensure that Color Underlay is selected, but that Range
Auto is cleared.
) and ensure that Color Underlay is selected, but that Range
Auto is cleared.
To create a correlation using the Create Well Correlations dialog box:
Using the Create Well Correlations or Correlation Wizard dialog boxes enables you to latch correlations more accurately than using your mouse.
If a well doesn't have any tops, GeoSyn prompts you to populate the well's empty top list with tops from another well. The Populate Empty Top Lists dialog box appears. Select the well with the tops with which to populate wells without tops, and then click OK.![]()
1. From the Edit menu, select Correlate
Wells ( ).
).
The Create Well Correlations dialog box opens.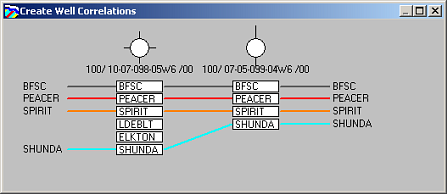
2. Do any of the following:
To create a new correlation,
click Start in the Create Well
Correlations toolbar. Working from left to right, click the top to which
to latch the correlation within the desired wells. You don't have to include
each well in your correlation.
The correlation automatically ends after you click the last well. To end
a correlation without latching it to the right-most well, in the Create
Well Correlations toolbar, click End.
To change the top properties, right-click the top name and select Edit top N, where N is the name of the top to edit, and then change the top properties in the Top Properties dialog box (for details, see Related Topics below).
Each correlation takes its name from the left-most top in the correlation.
To create a correlation using the Correlation wizard:
1. From the Edit menu, select Correlate
Wells ().
The Create Well Correlations dialog box appears.
2. In the toolbar beside the Create Well Correlations dialog box, click Auto Cor Wizard.
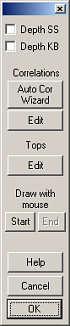
The Auto-Correlation Wizard
dialog box appears.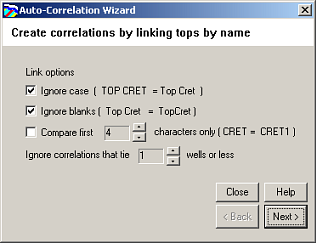
3. Specify the criteria by which to link correlations then click Next.
GeoSyn displays the number of complete and partial correlations.
Click Back to select further criteria in the Correlation Wizard dialog box above, or click Apply to create the correlations.
Each correlation takes its name from the left-most top in the correlation.
If your model becomes corrupted, launching the Correlation Wizard and then closing it without applying any correlation changes will correct it, although you'll have to recreate any inter-well nodes.
To create a correlation using the mouse
Although you can create correlations without a well in the depth model, you'll typically create correlations using only your mouse when drawing geologic anomalies such as channels.
1. From the Edit menu, select New
Correlation ( ).
).
The Create a New Correlation
dialog box appears.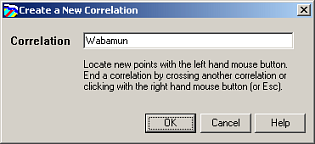
2. Type a name for the correlation or accept the automatically generated number and then click OK.
3. Click to the left of the left-most vertical scale to establish the start of the correlation then click the right-most border of the first well to latch the correlation to this well.
A new top with the same name as the correlation you specified above appears in the well. This top is also created in the GeoSyn 2D Tops list.
4. Click to the right of each remaining well to latch the correlation at the desired depth then click to the right of the right-most vertical scale to create a correlation that horizontally spans the entire depth model. You can't skip over a well when correlating.
To create a partial correlation that doesn't
span the entire depth model, after clicking to establish the final node,
either press ESC, or cross the
current correlation line over itself by dragging the cursor left of the
last node you established and click. Also note though that correlations
that don't horizontally span the entire cross section and don't cross
over themselves to encapsulate a velocity field don't affect the time
model.
To tie the current correlation to an existing correlation, cross the new
correlation line over the existing correlation line and click.
Two zones are automatically created on either side of the correlation line you drew.
Related Topics
| Editing Correlations | Configuring Zones |
| Changing Tops Properties |