Raster log display options |
|
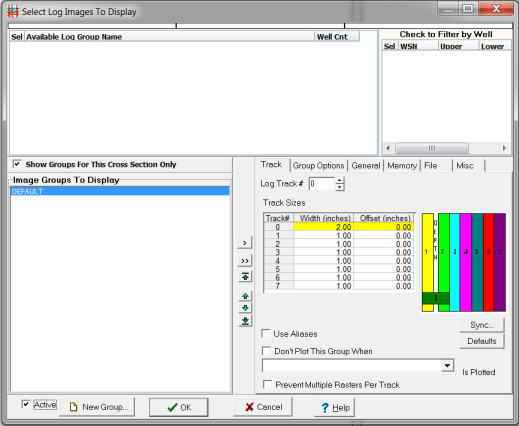
The cross-section displays log raster images for a given well by referencing group names. For example, you might display images from the "GR" group in track 1 and images from the "Default" group in track 2. Petra predefines one group called the "Default" group. You can create as many groups as you have different images for a well. Groups names should normally have something to do with either the log curves they contain or the sample rate of the log, i.e., "5-inch logs". Each well can have only one image in a group. However, there is no limit on the number of different groups you can define. Therefore, if you have 5 different log images for a well, you must have 5 different image groups defined. The well will have 1 image in each of the 5 groups. Available Image GroupsThis section contains a list of all defined image group names in the project. To dislpay an image group, select the desired log on the Available Image Groups list and left click the ">" button to the right of the Available Image Groups list. To add all logs to the Image Groups To Display list, left click the ">>" button to the right of the Available Image Groups list. Show Groups For This Cross Section Only - This filters the "Available Image Groups" list to only the groups in the currently selected wells. Thais can be a very useful way of quickly filtering out irrelevant group names. Image Groups To DisplayThis section contains a list of all image groups that will be displayed on the cross section. To drop an image group from the Image Groups To Display list, select the desired log and left click the ">>" button to the right of the Image Groups To Display list. To add all logs to the Image Groups To Display list, left click the ">>" button to the right of the Image Groups To Display list. Track tabEach selected image group has "Group Details" associated with it. Click to highlight one of the groups listed in the "Image Groups To Display" section. Then, set the appropriate detail options.
Log Track # - This defines the image's plotting position relative to the well symbol and digital log depth track. The track positions are illustrated for convenience. Track Width - The track width is entered in inches and determines the width of the log raster image. Typically, the track width should be set to the actual width of the paper log from which the image was scanned. NOTE - Log images use the same tracks as the digital log curves. Therefore, changing the width will also effect any digital curves displayed in the same track. Group Options tab
Show Extra Depths Above/Below CalibrationsDo Not Display Extra Depths - This option limits the raster to only the depth calibration points Display Extra Depths Defined in LIC File - This option displays additional depths listed in LIC file. Display Extra Depths Using Values Below - This option adds extra footage above and below the top and/or bottom calibration points. Petra simply extrapolates the distance between depth calibration points, so the extra distance can be erroneous or include other information on the scanned image. Show Pay Intervals - With these options checked, Selected pay intervals that have been defined during the calibration process will be drawn on the cross section. AliasesPlot Only First Aliased Group Found - This option only plots the first aliased image. Plot All Aliased Groups - This option plots all aliased images for a group. When multiple runs covering different depths are aliased together, this is a great way of displaying a more complete picture of the wellbore data. On the other hand, multiple aliased logs can be a real overposting mess. Show Pay Intervals - With this option checked, any pay intervals that have been defined during the calibration process will be drawn on the cross section. General tabThis section applies to all image groups and contains various plotting options and conditions.
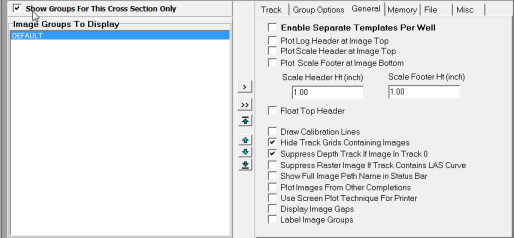
Enable Separate Templates Per Well - This option enables different sets of raster log image settings for different wells. With the huge variety of raster names, depths, and quality, individual raster settings can be a great way of creating ideal settings for each well. Plot Headers at Image Top - This option displays the section of the image defined as the header at the top of the image. Plot Scale Header at Image Top - This option displays the section of the image defined as the log scale header at the top of the image. Plot Headers at Image Bottom - This option displays the section of the image defined as the header at the bottom of the image. It may be necessary to increase the size of the bottom margin it the bottom header becomes clipped. Scale Header Height (inches) - The amount of space to reserve for plotting the header section, both above and below the curve section. The header section will be "stretched" the fit this height. Scale Footer Height (inches) - The amount of space to reserve for plotting the header section, both above and below the curve section. The header section will be "stretched" the fit this height. Float Top Header - Normally, the top header section will appear just below the well symbol at the upper depth of the cross section. This option will cause the top header to float with the top of the image curve section even if the image starts deeper than the upper depth of the cross section. Draw Calibration Lines - This option will draw lines across the image at the calibration depths. Use this option to compare the image calibration depths with the digital depth track. Hide Track Grids Containing Images - This option causes digital track grids to be hidden if the track contains a log image to be displayed. Suppress Depth Track If Image in Track 0 - Petra draws the depth track directly underneath the well symbol in track 0. This option prevents the depth track when there is a raster in track 0. Show Fill Image Path Name in Status Bar - When you bring the mouse over the raster image, Petra displays the raster's group name and image file name. This option instead displays the full image pathway. This option can be useful for troubleshooting. Plot Images From Other Completions - By default, Petra will only display raster images from the exact well, and not from other completions. This option enables raster images from other completions. Use Screen Plot Technique For Printer - This option changes how Petra draws raster logs. Select this option when the Cross-Section Module plots incorrectly. Memory tabThe memory tab changes how Petra works with image files. This can affect Petra's redraw speed and system resources.
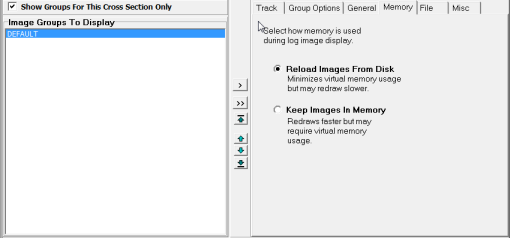
Reload Images From Disk With this option, Petra refreshes raster image files from the network or local disk every time the cross section's appearance changes. With a large Layer File and a slow network, this can translate to poor performance. Keep Images in Memory This option tells Petra to load the raster image files once and keep them in local memory rather than continually refreshing from the network or local drive. By eliminating waiting on the network, this option accelerates redrawing at the expense of using more RAM. File tabLoad Template - This button loads an external Log Image Temlpate (*.LIT) template file. Loading an external file will overwrite the current raster settings. Save Template - This button saves the current raster log settings to an external Log Image Temlpate (*.LIT) template file. Misc tabPay Label Text Height - This option sets the text height in inches of the raster log pay labels (set on the Pay tab). Opaque Text - This option causes open wells symbols, such as a gas or dry hole symbols, to be plotted using the background color (normally white) to fill the interior of the symbol. Use this option when you wish the well symbols to stand out against a colored background. Pay Label Position - This option sets the location of the pay label. 1 is outside the pay interval on the left, 2 is left-justified, 3 is centered, 4 is right-justified, and 5 is outside the pay interval on the right Use Pay From Calibration Files. Do Not Use DB Pay - Calibration files can store pay intervals. This option forces Petra to use the pay intervals from the calibration file, rather than the project database. This can be useful for temporarily reviewing old pay intervals. |