|
The log footage summation function calculates log footage and reservoir parameters using digital logs. Essentially, the function analyzes digital logs and sums up the footage that meets a set of user-defined criteria. This footage is stored as a zone data item.
These summed footages and reservoir parameters can be computed for one or more zones simultaneously. The calculation can be done for all selected wells in the main module or on only the currently selected well in the main module.
As an example, Petra can calculate net pay in the D sand by computing how much section has GR below 60 API, porosity above 10%, and resistivity above 10 ohms between the top and bottom of the D sand. As shown in the following log, only the interval from 6346' to 6353' fits all three criteria, and will calculate as "Net."

Calculating a Gross footage, a Net footage, and a Net/Gross ratio will generate a set of data items that look like this:

To open the Log Footage Summation tool, select Compute>From Logs> Footage (Reservoir Properties)
from the menu bar at the top of the Main Module.
Data tab
All the curve drop down boxes on the lower half of this tab have two names. The "Porosity" drop down box is also "Condition 1."
The first through fourth Log Curve drop down boxes, "Porosity", "Water Sat", "Permeability", and "Gamma Ray" only need to be filled with the named log (a density porosity log in the "Porosity" slot, for example) if you are calculating the reservoir statistical measurements Poros Ft, Perm Ft, Hydrocar Ft, Avg Porosity, Avg Perm, or Avg SW. The first three footage types, Gross, Net, and Net/Gr, completely ignore these named definitions.
The Gross calculation sums footage in the Gamma Ray/(Condition 4)'s drop down box. You can easily put an SP or resistivity curve as your "Condition 4" and calculate Gross feet on that. Similarly, the Net calculation sums footage that satisfies conditions on all checked drop down boxes regardless of curve drop down box name. In the screenshot above, a Net calculation will sum log footage that has density porosity (DPHI) between 0.10 and 1, gamma ray (GR) between 0 and 100 API, and a deep induction (LLD) between 10 and 9999. In the example above, putting the LLD curve into the Permeability/(Condition 3) drop down box will still have the same result.
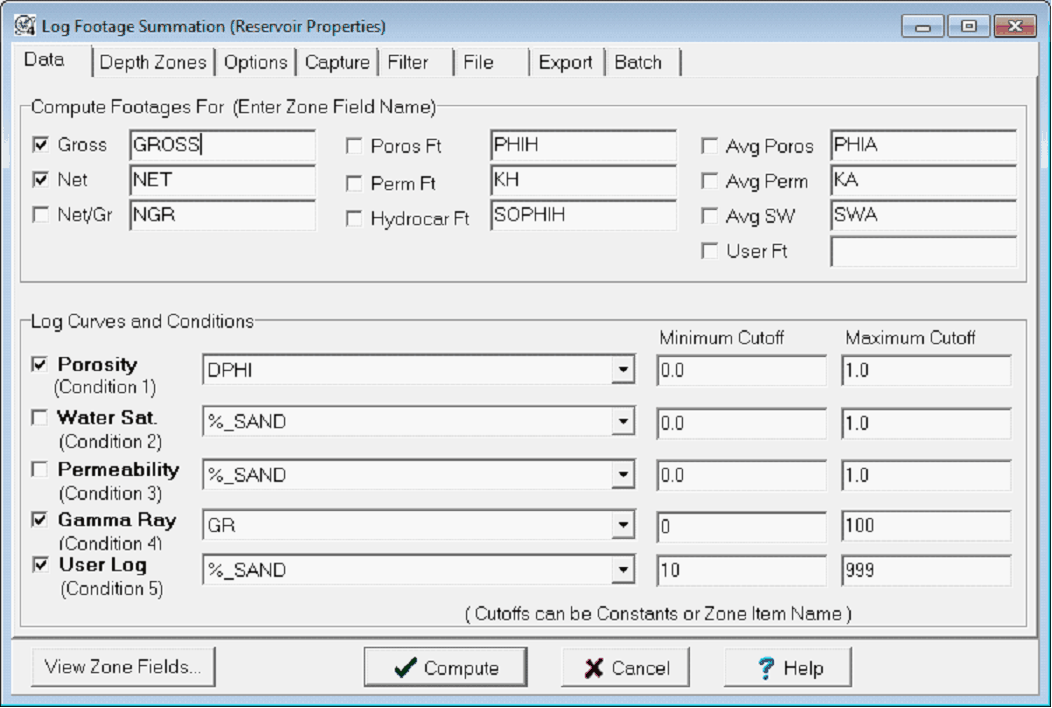
Compute Footages For (Enter Zone Field Name)
First, select the type of footages to calculate by checking the small box beside each reservoir parameter. Each of these footage parameters will be stored as a data item in the zone selected in the Depth Zones tab. Default names for the data items are provided for each parameter, but these names can be changed by simply typing over the name. As an example, you can change "GROSS" to "D_SAND_GROSS."
Gross - Gross footage is computed using one of two methods selected in the Options tab. It is either the isopach thickness based on the zone's upper and lower depth or it is summed using the GR/(Condition 4) log curve cutoff condition.
Net Net footage is the summation of the total number of feet where the Porosity /(Condition 1) curve passes its cutoff criteria. All checked log curve drop down boxes cutoffs are used as cutoff criteria.
Net/Gr (NGR) - Ratio of the Net divided by Gross. You must compute Net and Gross in order to compute Net/Gr.
Poros Ft (PHIH) - Summation of each sample interval multiplied by each Porosity/(Condition 1) curve value passing all cutoff criteria. You must also select Net with this option.
Perm Ft (KH) - Summation of each sample interval multiplied by each Permeability/(Condition 3) curvevalue passing all cutoff criteria. You must also select Net with this option.
Hydrocar Ft (SOPHIH) - Hydrocarbon Feet is the summation of each sample interval multiplied by each Porosity/(Condition 1) times 1.0 - Water Sat/(Condition 2) passing all cutoff criteria. Requires porosity and water saturation curves.
Avg Poros (PHIA) - Arithmetic mean value of all Porosity/(Condition 1) curves values passing all cutoff criteria.
Avg Perm (KA) - Arithmetic, geometric, or harmonic mean value of all Permeability/(Condition 3) curve values passing all cutoff criteria. Select the method of averaging in the Options tab.
Avg SW (SWA) - Arithmetic mean value of all Water Sat/(Condition 2) curve values passing all cutoff criteria.
User Ft - Summation of the total number of feet where all cutoff criteria are meet.
Log Curves and Conditions
This section is used to select the log curves and their cutoff criteria for the summation. Check the small box to the left of each curve drop down box list to indicate selection. Unselected boxes are not used as cutoff criteria.
Porosity Log - This log is used for all Net calculations as well as for PHIH, HPV, and PHIA calculations. You may select any type of log here to be used in a generic Net calculation.
Water Saturation- When used for HPV calculations, this log must specify a water saturation curve. For generic Net calculations, specify any log type.
Permeability - When used for KH and KA calculations, this log must specify a permeability log. For generic Net calculations, specify any log type.
Gamma Ray - When used for "Gross Sand" calculations, this log should specify a gamma ray, vshale, or other sand indicating log curve. Otherwise, you may specify any conditional curve for net calculations.
User Log - Any additional log curve and condition you want to use.
Cutoff Criteria
For each log selected for use, enter the cutoff limits as the minimum and maximum allowed values. The curve "passes" the conditional test whenever its value falls within the minimum and maximum range. Be careful of values expressed as a percentage, like porosity. 5% porosity can be expressed as "5" or as "0.05." Make sure to check your logs for consistency.
View Zone Fields... - This button brings up the "View/Edit Zone Data" dialog where you can check computed results.
Depth Zones tab
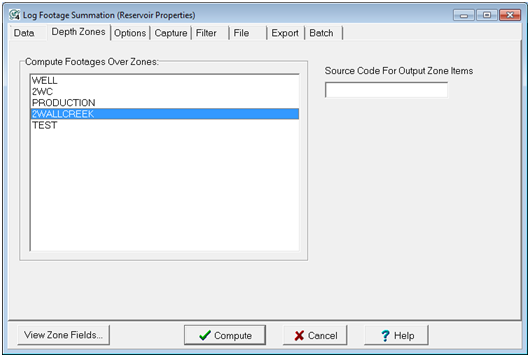
Compute Footages Over Zones
Petra reads the top and bottom depths defined on the selected zone's interval definition, and will calculate footages over that interval. In this example, the D_Sand zone is defined by the D_SAND fm top as the top, and BASE_D_SND fm top as the base. This interval can be further constrained with the Filter tab. Since the limits of the calculation come from each zone definition, you can select one or more zones for the reservoir footages calculation.
If your zone intervals are defined by the default -99999.0 to +99999.0 MD - You will need to either define the zone, or specify a top and bottom with the Filter tab. Otherwise, Petra will calculate log footage from -99999 to 99999 MD. Since any limits will come from the Filter tab, you can only select one zone to calculate reservoir footages.
After the summation, each selected zone will contain new data items for each reservoir summation checked and named in the Data tab.
Source Code for Output Zone Items This adds a source code to newly created reservoir data items. Changing the Source Code when repeating a log footage summation will create an entirely new set of data items with the new source code.
Options tab
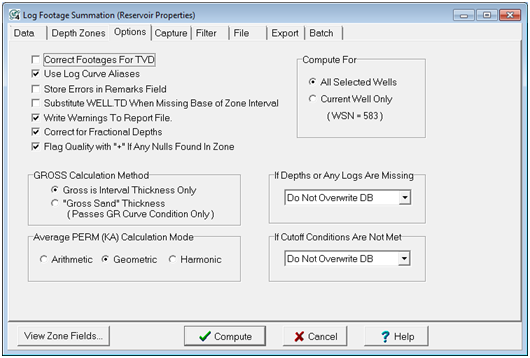
Correct Footages For TVD - Check this option if you wish to use True Vertical Depths instead of Measured Depths. This will have an effect only on wells with survey data.
Use Log Curve Aliases - This option causes log aliases to be used. When a specified curve is missing, an alias log will be used. This is very useful for large projects. Log curve names are aliased under the Log tab in the main module.
Store Errors in Remarks Field - Use this option to store a remark in the zone item containing the reason a well could not be computed.
Substitute WELL TD When Missing Base of Zone Interval - Use this option to use the TD value as the base of the zone interval whenever the interval top is present but the interval base is missing (null). The TD value must be stored in the WELL zone and TD zone item. The quality code field of the computed value will contain a code of "TD" to indicate that the TD was substituted for the base. This can generate anomalously high results if there is more log section below the interval of interest, or anomalously low results if the well does not completely penetrate the interval.
Write Warnings to Report File this generates a report file called "FOOTSUM.TXT" in the project's PARMS directory. This will report errors due to missing tops or incomplete log sections.
Correct for Fractional Depths - This option determines whether a full or fractional amount of the sample rate is accumulated for the first and last depth sample. For example, if a zone started at fm top 4100.5 ft and the curve sample rate was 1.0, with values at 4100.0 and 4101.0, then checking this option would sum only 0.5 ft for the first sample, instead of 1.0 because only half of the data falls within the zone. When this option is unchecked, any sample that passes the conditions gets a full sample rate accumulated.
Flag Quality with "+" If Any Nulls Found in Zone This generates a "+" sign in the quality field if any null values are found in any curve used for a log footage calculation. This is a sign that part of the curve was not used, so the footage reported is a minimum.
GROSS Calculation Method
This section determines how "GROSS" is computed for each zone.
Gross Interval Thickness Only - This option subtracts the upper interval depth from the lower interval depth. Interval depths are defined by the zone reference depths. If the log curves define a smaller interval, i.e., the log data does not extend over the entire zone, then the Gross value will reflect the smaller interval thickness.
"Gross Sand" Thickness (Passes GR/(Condition 4) Condition Only) - This option must have a Gamma Ray/(Condition 4) curve specified and the resulting Gross value is the number of feet where the curve passes its cutoff condition. Any log, such as an SP or resistivity log, can be placed in the Gamma Ray/(Condition 4) drop down box for this calculation.
Average PERM (KA) Calculation Mode
This selects the method of computing average permeability.
Compute For
This simply chooses whether a footage summation is for calculated for all selected wells in the main module, or only for the currently selected well in the main module.
If Depths or Any Logs Are Missing
This tells Petra how to deal with missing log curves or depths.
Do Not Overwrite DB This option will not write anything to the database. Use this if you have already done work in these exact zone data item fields.
Store Zero This option will overwrite the data item with a zero. A missing GR curve does not mean that there is no pay, so use caution with this option.
Store Null This will overwrite a value in the data item with a null.
If Cutoff Conditions Are Not Met
This tells Petra how to handle logs that do not meet the petrophysical cutoff conditions outlined in the Data tab.
Do Not Overwrite DB This option will not write anything to the database. Use this if you have already done work in these data item fields.
Store Zero This will overwrite the database with a zero. A full suite of logs that does not meet the cutoff conditions probably does mean that there is zero net pay. However, odd log scaling or percentages stored as integers (5% as "5") can result in curves not meeting cutoffs when they should.
Store Null This will overwrite the data item with a null.
Capture tab
The Capture tab allows you to collect other data about the footage operation.
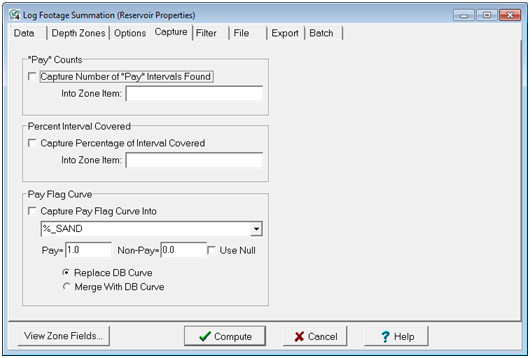
"Pay" Counts - This section allows you to capture the number of "pay" intervals that passed the cutoff criteria within each computed zone. The number of "pay" intervals will be stored in the specified Zone Item name. There will be a count for each zone interval selected for calculation. Higher pay counts can reflect multiple pay intervals within a zone, or more variable reservoir quality.
Percent Interval Covered This section allows you to capture the percentage of the zone covered by logs. Petra reads the upper depth of the shallowest log curve and the lower depth of the deepest log curve, and compares these to the zone definition to calculate a percentage. If your zone is defined by the default -99999 to 99999 MD, this will be a meaningless number.
Pay Flag Curve This section generates an additional log curve that reflects the Net log footage summation. Pay and Non-Pay can be defined as any number or null values. Usually, Pay is defined as 1 and Non-Pay as 0 or Null.
In the D sand example, the pay zone at 6350' defined by GR, LLD, and DPHI is clearly shown by the PAY curve at the far right. In addition to simply showing pay intervals, these curves can be useful in log calculations. For example, to selectively erase a curve everywhere but over a pay zone you can multiply porosity by a pay curve where pay is 1, and non-pay is null.

Filter tab
The filter tab sets controls on what log interval inside the zone definition is considered during the footage summation.
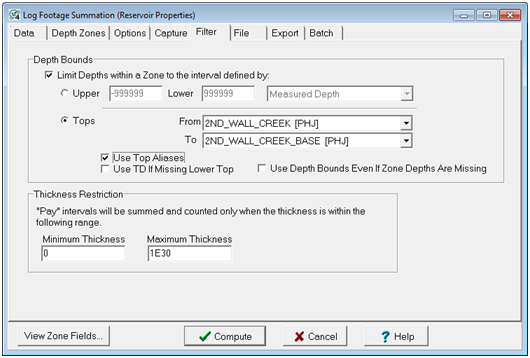
Depth Bounds
Setting Depth Bounds allows you to set upper and lower limits on the interval inside a zone used for a log footage calculation. These limits can be from a discrete MD or TVD depth, or from fm tops. How this works will depend on how you have defined your zone.
If your zone intervals are defined by tops and are selected in the Zones tab Setting a limit in the Filter tab can only limit the interval inside zone-defined top and bottom as limits. This can be useful if your selected zone is defined as a large interval, and you want to calculate footages over a relatively smaller interval inside that zone.
If your zone intervals are defined by the default -99999.0 to +99999.0 MD- Specify a top and bottom with the Filter tab. Otherwise, Petra will calculate log footage from -99999 to 99999 MD.
Use Top Aliases . This tells Petra to use top aliases in setting limits. Top aliases are set in the Main module under the FmTops tab.
Use TD if Missing Lower Top - Use this option to use the TD value as the base of the zone interval whenever the interval top is present but the interval base is missing (null). The TD value must be stored in the WELL zone and TD zone item. The quality code field of the computed value will contain a code of "TD" to indicate that the TD was substituted for the base. This can generate anomalously high results if there is more log section below the interval of interest, or anomalously low results if the well does not completely penetrate the interval.
Use Depth Bounds even if Zone Depths Are Missing This tells Petra to use the depth limits set in the Filter tab if the tops that define the Zone are absent (see above). If your zone intervals are set to the default -99999 to 99999 MD, this button has no effect.
Thickness Restriction
This sets a minimum and maximum pay thickness that will be added to the summation. Without this restriction, an interval with 15 two foot thick uneconomic stringer sands will add up to 30' of pay.
File tab
The File tab allows you to save log footage settings and recall them later. This is useful if you are working with multiple pay zones or with running multiple petrophysical cutoffs. Saving templates is also useful for running batch footage summations with the Batch tab.
Load Template - This button loads an external log footage template file.
Save Template - This button saves the current settings to an external log footage template file.
Export tab
The Export tab allows you to export a comma delimited spreadsheet file (*.CSV) that contains the top and base of each log interval meeting the log criteria. This can be very useful for developing an inventory of uphole pay zones behind pipe.
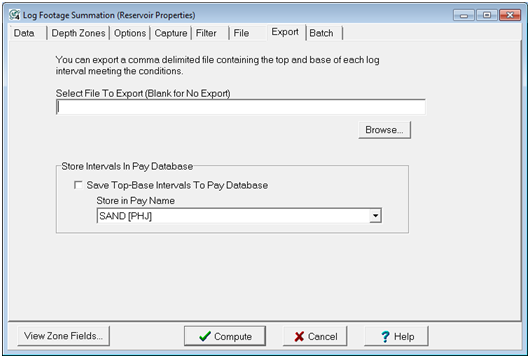
This CSV exports UWI, Name, Number, Label, Top in MD, Base in MD, Top in SSTVD, and Base in SSTVD.
For the D Sand example above, a Net footage export looks like this:

Of the types of footages, only the Net and Gross intervals have a top and a bottom; the rest, like Net/Gr, are statistical measurements of reservoir quality. When a Gross interval alone is calculated, this export will be gross interval. When a Net interval alone is calculated, this export will be the net interval. If Gross and Net are simultaneously calculated, the export will be the net interval.
Store Top-Base Intervals to Pay Database
This option allows you to save the intervals to the raster pay database.
Batch tab
The Batch tab allows you to run multiple log footage summation templates (see FILE TAB above) as a batch. This is particularly useful for areas with multiple pay zones, or for running summations on the same zone in different ways with different curve conditions. You change the queue either by using "Select Files" or by using the add "<", drop ">", or clear all items ">>" buttons
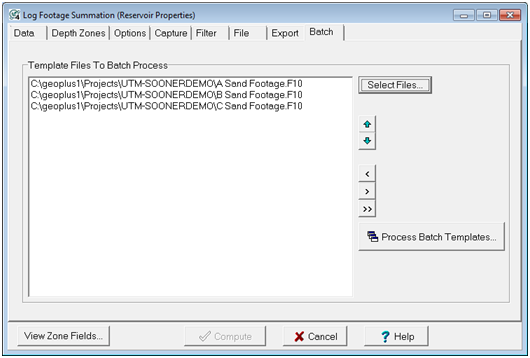
Select Files - This button adds multiple template files from the same location. Click "Select Files" and navigate to the location of your template files. Next, highlight the template files by left clicking and dragging the mouse or by using SHIFT+Left click or CTRL + Left click. It is important that template files are all in the same place. Using "Select Files" again will replace any already selected template files.
Using the Add and Subtract buttons is faster for adding multiple files in different locations. Click the add button "<", and navigate to the location of your template file. You can only add one template at a time this way. The subtract button ">" will drop a selected template file. The drop all templates button ">>" will clear the list.
|