Printing synthetics
By default, a printed page outline appears on the main synthetic display bounding the pane that will fit on the paper size selected for the default printer. Because most printers don't print right to the edge of the page, an additional three-quarters of an inch of image inside the print margin won't be printed.
Toggle whether the page outline appears in the main synthetic display using the Synthetic Properties dialog box.
If you change the paper size using the File > Print Setup dialog box, the page outline in the main synthetic display changes too.
Print either the current synthetic or select a group of GeoSyn synthetics saved to disk and print them in one batch. Separate procedures for each appear below.
To print current synthetics:
1. Verify how the current synthetic will appear when printed by selecting File > Print Preview.
The Print Preview dialog box opens.
2. From the File menu, select Print(![]() ), or click
Print in the Print Preview dialog box above.
), or click
Print in the Print Preview dialog box above.
The Print dialog box opens.
3. Select the desired print options then click OK.
To print multiple GeoSyn files:
1. From the File menu, select Printing.
The Batch Printing dialog box opens.
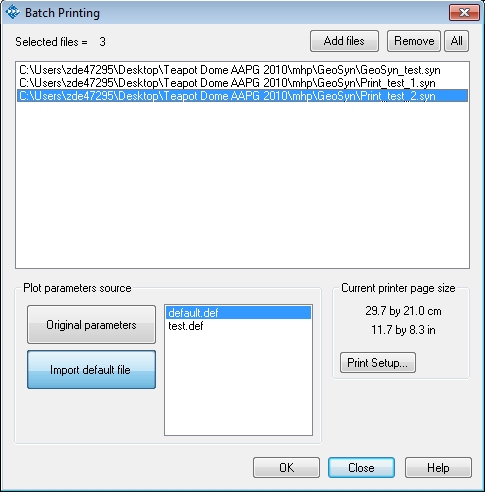
2. Click Add files, browse to and select the desired file(s). SHIFT+CLICK or CTRL+CLICK for multiple selection.
To sort files by UWI, click either Browse dir. or Browse sub-dir. to launch Directory Browser. For details on using Directory Browser, see Related topics below.
3. In the Open a ... format file dialog box, click Open.
4. Select either Original parameters to print each file using display parameters specified in its own file, or Import default file to select a default file from the current GeoSyn Working directory from which to use parameters.
5. Click OK.