Trimming models
Change the depth range of the depth model by using the Display Parameters: Depth Model dialog box and either typing a new depth range in the Dimensions area, or by clicking Trim Model. While clicking Trim Model automatically deletes all correlations, nodes, and well data outside of the trim range, typing new dimensions won't reduce the model depth range if it entails deleting data.
Instead of trimming the depth model, reduce the portion
of the depth model that's displayed by typing values in the Display Range
pane of the Display Parameters: Depth Model dialog box. Changing the display range doesn't delete anything,
it merely hides the top or bottom of the model. You can also change the
display range by hovering your mouse over the top or bottom canvas border
until the cursor changes to a cross hair (
 ), and then dragging the canvas border.
If trimming by subsea values instead of by correlation marker, ensure you remove flattening from your cross section because the Trim Depth Model dialog box trims using true subsea values while flattening references the correlation upon which you flatten as zero.
To trim models:
- Right click the correlation above or below which to trim and from the shortcut menu, select Trim model above correlation or Trim model below correlation.
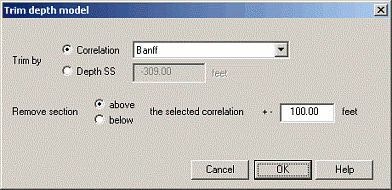
- Select whether to trim based on a specific correlation or by subsea depth, and the amount of buffer to leave between the trim line and the correlation, and then click OK.